This article is a continuation of the FileMaker OAuth 2.0 Authentication Here we will show you how OAuth works with some sample code and how it can be used to log on to Custom FileMaker application.Steps Involved-
- Configure FileMaker Server / Cloud
- Create Application and configure it on provider’s account
- Set up Groups or Accounts in FileMaker file
1. Configure FileMaker Server / Cloud
The first step to use OAuth is to enable External Authentication on FileMaker Server/Cloud.
Enabling EA on FileMaker Server: First, you need to login to Admin Console of FileMaker Server and then you can go to Database Server>>Security and in Client Authentication area select FileMaker and External Server Accounts and then enable the OAuth Providers.

Enabling EA on FileMaker Cloud: In this case, you need to login to Admin Console of FileMaker Cloud and then you can go to Configuration>> Client Authentication, and from there you can enable OAuth Identity Providers.

2. Create Application and configure it on provider’s account
Now that we have enabled OAuth Authentication next we have to Create OAuth Client ID Credentials on provider’s account.
Amazon
- Sign up at- https://login.amazon.com/manageApps
- Create OAuth Client ID Credential
- Set Allowed/Authorized Return URLs (https://FullyQualifiedDomain/oauth/redirect)
in our case FQD: https://metasys.fmi.filemaker-cloud.com - Copy Client ID and Client secret into FileMaker Server / Cloud
- Set up Accounts in FileMaker file


- Sign up at- https://console.developers.google.com
- Create OAuth client ID Credential
- Set Allowed/Authorized Return URLs (https://FullyQualifiedDomain/oauth/redirect)
in our case FQD: https://metasys.fmi.filemaker-cloud.com - Copy Client ID, Client secret into FileMaker Server / Cloud
- Set up Accounts in FileMaker file


Microsoft Azure
- Sign up at- https://portal.azure.com
- Create OAuth client ID Credential
- Set Allowed/Authorized Return URLs (https://FullyQualifiedDomain/oauth/redirect)
in our case FQD: https://metasys.fmi.filemaker-cloud.com - Copy Client ID, Client secret and Tenant ID into FileMaker Server / Cloud
- Set up Accounts in FileMaker file

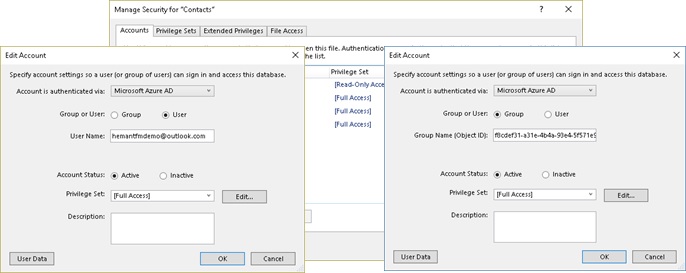
With Azure, we can also configure to log in with group
- Create Group in Azure Active Directory
- Add User to the GroupEnable Group Authentication in Application manifest (set “group membership claims”: “SecurityGroup”)