Mapbox provides custom maps, search and navigation. It supports many platforms. The tool is powered by programmers as well as millions of devices providing Location Data. It provides developers a platform and a toolset to build customized applications where location-based data can be used to meet a variety of business requirements.
A typical scenario where Mapbox is used:
A service provider uses Mapbox to track locations of their assets or employees in order to provide real-time information to customers or for operational monitoring. This could be a restaurant delivery service, an international transport company or even a fleet operator in a city.
Customizing Mapbox
One of our clients provides data services to monitor the health of agricultural farms. They wished to offer compelling data visualization of agricultural farm images along with other details. We customized mapbox to render this information on the web and mobile devices. There are SDKs available for the Web, iOS and Android.
In this article, we share how we configured mapbox in React JS using custom style to add new fonts, custom icons and publish these styles.Following are the steps involved –
1. Steps to generate the token number and style in Mapbox
- a. Create an account on https://account.mapbox.com
- b. Log in to your account
- c. On the Dashboard look for the Default public token. This Token number can be used for configuration in the Web App. You need to remember that this token number is public and easily accessible from the developer tab.
- d. To get the private Token click on the button ‘Create a Token’ you will get a form. Enter the ‘Token name’ and select the desired ‘Public Scope’ and the ‘Secret Scopes’.

- e. Note: – This token will only be accessible from the specific URLs that we add while generating the Token.

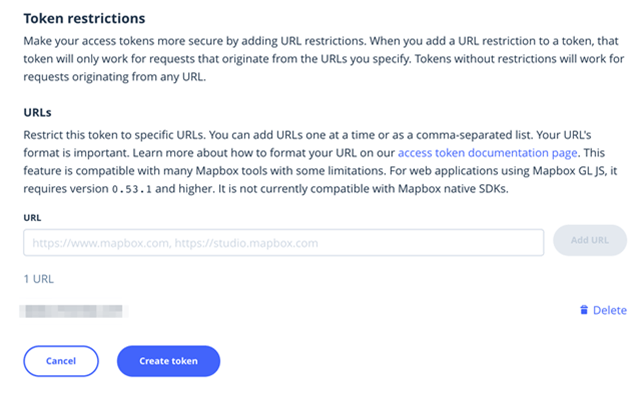
- f. Now add the list of comma-separated URLs into the URL field and click on the ‘Create Token’. Next you will be asked to confirm with your account password.
- g. You will find the private token at the bottom of the Token list.

2. Steps to configure React JS app with Mapbox
- a. There are two different methods available for using the Mapbox on the web App.
We describe the steps using the ‘npm’ module bundler for installing Mapbox GL JS.

- b. Install the ‘npm’ package –> ‘npm install mapbox-gl –save’
- c. Include the GL JS CSS file
- d. Include the CSS file in theof your HTML file
- i.<link href=’https://api.mapbox.com/mapbox-gl-js/v1.3.1/mapbox-gl.css’ rel=’stylesheet’ />
- e. Add the map to your Web App.
- i. var mapboxgl = require(‘mapbox-gl/dist/mapbox-gl.js’);
- ii. mapboxgl.accessToken = ‘Your Token number’;
- iii. var map = new mapboxgl.Map({
- iv. container: ‘YOUR_CONTAINER_ELEMENT_ID’,
- v. style: ‘mapbox://styles/mapbox/streets-v11’ // Default style link
- vi. });
- f. Now you are done with the configuration.
3. Steps to create the custom style of Mapbox
- a.To create our custom style for the map, we need to open the Mapbox Studio,
- b.To open the Mapbox studio, you can to go to the Dashboard and then click on the ‘Design in Mapbox Studio’ on the right side of the Dashboard or Just click on the link here https://studio.mapbox.com/
- c.After opening the Mapbox studio, you can see the predefined styles you can use directly or you may choose to create a new style.

- d. To create a new style, click on the ‘New style’ button on top of the page.
- e. Select the desired template from the list and can change the style of the map from bottom of the dialog and then click on the customize button.

- f. You can see a dashboard with different settings.
- g. You can update the style of the country label, background, road, buildings and many more


4. Steps to add a new font to the map and then publish for production
- a. Click on the Fonts tab on the top-right corner then you can find a dialog to upload the new fonts.

- b. Clicking on the Upload new font, you can see a new dialog with the title ‘Upload fonts’ here you can drag new fonts with extension ‘.TTF’ and ‘.OTF’.

- c. Once Font family is added, it can be then used in the map.

5. Steps to add a custom icon or an image and publish
- a. The image we upload here will be available as an icon on the map for example Image as a custom marker.
- b. Click on the ‘Images’ tab in the header you can see a dialog to upload the SVG image.


- c. To upload the SVG image, click on the ‘Upload SVG Icon’ button, now you can see a new dialog where you can drag your SVG image.
- d. Once you update any style, you have to publish the style to see the changes on the map.
- e. Note: – It may take some time to get published and to reflect on the map.
- f. It is very easy to publish the changes; you just have to click on the ‘Publish’ button on the top-right corner of the map box studio.

- g. Now you can see a dialog with a slider where you can see the styles you added.
- h. Here you can either ‘Publish as new’ which will replace all the styles, or, use the ‘Publish’ button to add the styles you added in your draft.

6. Steps to add the updated style to our map
- a. Once the style is published,click on the ‘Share’ tab on the top-right corner of the Mapbox Studio. Here you can see a dialog where you can find your ‘Your style Url’ and ‘Your access token’.

- b. Now update your style URL of the map.
- i. var map = new mapboxgl.Map({
- ii. style: ‘Add your style URL Here’
- iii. });
- c. Example:
- i. const feature: feature = {
- ii. id: 123,
- iii. type: ‘Feature’,
- iv. geometry: feature.geometry,
- v. properties: {
- 1. meta: feature.meta,
- 2. icon: ‘square-stroke’
- 3. // Custom Icon name which is added to the style in Mapbox Studio
- vi. }
- vii. }
We at MetaSys software have helped the clients in building such kind of custom software solutions. For more details – https://www.metasyssoftware.com/case-study-react